![Highland_logo_1millionmiles_Brandmark_White-1.png]](https://24210048.hs-sites.com/hs-fs/hubfs/Highland_logo_1millionmiles_Brandmark_White-1.png?width=40&height=40&name=Highland_logo_1millionmiles_Brandmark_White-1.png)
Towing
The preferred method of towing a Blue Bird electric bus is to tow the bus with the front wheels on the ground. If the bus is towed with the rear wheels on the ground, the driveshaft MUST be removed.
To remove the driveshaft, do the following:
- From under the bus, locate the driveshaft behind the rear axle housing and remove the capscrews that secure the yoke straps at the forward universal joint
- Using a pry bar, carefully apply linear pressure to the driveline allowing the slip joint to provide clearance from the universal joint. Carefully, lower the driveline allowing it to rest in the driveline guard
- Wrap the universal joint on the forward driveline with tape in order to retain bearings
- Moving to the rear joint at the axle housing differential, remove the capscrews that secure the yoke straps to the hub. Carefully, lower the driveline removing it from the driveline guard
- Wrap the universal joint on the end of the removed driveline with tape in order to retain bearings
- Store driveline in the rear of the bus in preparation for towing
- After the tow truck has been hooked to the bus, release the parking brake and remove the wheel chocks
- Discard removed capscrews and straps
On buses with hydraulic brakes, the parking brake becomes ineffective when the driveshaft is removed which could allow the bus to roll if the wheels are not chocked. Chock the wheels.
Do NOT secure the driveshaft to any high voltage or low voltage wiring, cooling hoses or brake lines.
Moving the bus with the rear wheels on the ground and driveshaft not removed, even for a short distance, can cause the drivetrain motor to overheat and lead to irreversible damage of the motor and possibly start a fire.
On buses equipped with air brakes, if full normal air pressure cannot be provided to the air system, the parking brakes must be mechanically caged to prevent their engagement.
Caging the spring breaks (for buses equipped with Air Brakes)
Caging the spring brakes disables the parking brake. Chock the wheels. Failure to comply can result in serious injury or death.
- On each of the rear combination brake chambers, a special release stud tool is carried in a storage socket cast into the body of the chamber. Remove the nut and washer from the end of the release stud tool and remove the tool from its socket
- Remove the rubber dust cap from the access hole in the upper end of the Spring Brake Chamber. Insert the toggle end of the release stud tool into the access hole. Be sure that the tapered end of the tool has entered the hole in the piston inside the chamber. Insert the tool until it bottoms
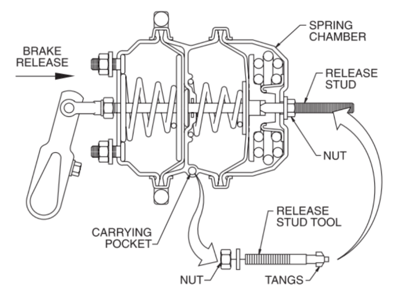
- Rotate the release stud tool a quarter turn clockwise and pull outward to engage the toggle end with the piston. While holding the bolt in its engaged position, install the washer and nut onto the end of the tool. Turn the nut down against the flat washer until finger tight
- Using a 3/4-in. hand wrench (do NOT use an impact-type wrench), turn the release nut clockwise until the internal spring is fully caged
- Repeat the procedure for the Spring Brake Chamber on the opposite side of the bus. The spring brakes are now released, having their springs compressed by the release bolts.
- The bus is prepared for towing
The bus may be equipped with optional tow hooks located just inside the access openings of the front and/or rear bumper

Never attempt to lift the bus by the tow hooks. Tow hooks are designed for horizontal pulling only; NOT FOR LIFTING. Failure to comply can result in serious injury or death.
Damaged buses should be isolated outdoors until inspected. Separate the bus from all combustibles and structures by a distance of at least 50ft (15 mt). Failure to comply can result in serious injury or death.
For additional details on Blue Bird buses, please refer to the Blue Bird Drivers Handbook