![Highland_logo_1millionmiles_Brandmark_White-1.png]](https://24210048.hs-sites.com/hs-fs/hubfs/Highland_logo_1millionmiles_Brandmark_White-1.png?width=40&height=40&name=Highland_logo_1millionmiles_Brandmark_White-1.png)
Cold Weather
Ensure your buses are prepared for inclement weather, especially in temperatures below 30° to avoid turtle mode* and conserve battery life.
Winter Pre-Trip Routine
- Unplug the bus from the charger
- Turn the bus on completely, including cabin heaters
- Plug the bus back into the charger
- Let the bus warm up for 10-15 minutes
- Unplug the charger and start the route
Maintaining Battery Range
- Set the heat to a comfortable (70° is recommended) temperature at medium blast
- If heat is no longer required, turn the temperature to the lowest setting, or shut off
- Set the fan dial to the lowest setting, or shut off
- Leaving the knob on a high setting will reduce range
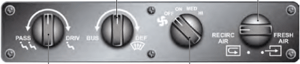
- Leaving the knob on a high setting will reduce range
- Keep windows closed to conserve heat
- Turn the HVAC system off (heating or cooling) if you are going to be idle for a long period of time and it is safe to do so
*Turtle mode: Drive power is restricted. Typical causes for this condition include the high-voltage batteries not being sufficiently charged or being at its operating temperature limit, such as in very cold outdoor temperatures.
To Increase the Range of the Bus
Regenerative Braking
Use the Regenerative Braking feature for smoother braking and increased range
- The EV comes equipped with a regenerative braking system. When the accelerator pedal is released, the electric motor will act as a generator to slow the vehicle down while at the same time feeding energy back into the batteries. If the batteries are over 90% SoC, the regenerative braking effect will be limited
- Drivers may notice slight differences in the amount of pressure on the brake pedal that is required to slow or stop the vehicle. The vehicle may also slow down faster while the vehicle is coasting, this is normal.
- Although allowing the bus to coast and progressively slow down during a stop regenerates electricity into the batteries, using the brake pedal during stops should NEVER be discouraged
- DO NOT accelerate and decelerate often in an attempt to “regenerate” more power into the batteries. Smooth operation during acceleration and deceleration provides the highest driving efficiency
- Full throttle at 50% SOC has a slight torque decrease from full throttle at 100% SOC
Tips for Driving on the Road
- Accelerate and slow down in a smooth, moderate fashion
- Drive at steady speeds
- Anticipate stops; slowing down may eliminate the need to stop
- Drive at reasonable speeds
- Keep the tires properly inflated and use only the recommended size
- Perform all regularly scheduled maintenance
- Avoid sudden or hard accelerations since this can reduce the battery range of the bus
- Turn Temp Dial from “Red” to “Blue” zone when heaters are not in use. The “Red” zone activates HV coolant heaters regardless of heater blower activation. This practice will help gain the full mileage potential of the HV batteries
- If “Low Voltage” appears in the Instrument Panel Message Center, all auxiliary components should be shut down immediately, including all heaters, AC, and body fans. The bus should be moved to a safe location off of the road to park until the message clears, or proper troubleshooting is completed
Charging Tips
How to End a Charging Session
To start a charging session, park the bus in a safe charging location and conduct the following:
- Before charging the bus make sure the bus is in Park Mode with the park brake on and the ignition switch in the off position
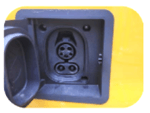
- Check the charging cord to make sure it is not damaged or wet. Open the charging port door and make sure it is clean and free of dirt or debris
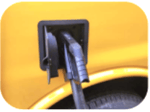
- Insert the handle connector firmly into the charging port. When inserted properly you will hear a ‘click’ indicating a good connection
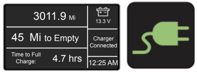
- When the charger is connected properly, the instrument cluster on the bus will display ‘Charger Connected’ and the warning light will illuminate green
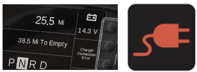
- If a charger error occurs, the cluster will display ‘Charging Error’, the warning light will illuminate red
- The charging process will begin after a short (5 to 10 second) delay. This is when a handshake between the vehicle and the charger will occur, determining the appropriate amount of energy that can be dispensed from the charger to the vehicle
It is important to check BOTH the charger and the bus dashboard to ensure they both indicate the bus is charging
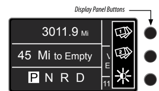
- With the ignition key in the OFF position press any of the three (3) buttons next to the message display center to indicate charging status
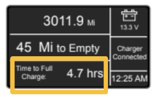
- The display will remain on for 10 seconds, then timeout. With the ignition key in the ON position, the charging status will display automatically. While charging, the instrument cluster will indicate ‘Time to Full Charge’
- If the charging session does not begin, unplug the charger, wait 30 seconds - a real 30 seconds of singing ‘Happy Birthday’ to yourself twice - then try plugging-in again. During this 30 second span you will hear clicks and relays from the bus. The bus is checking itself to ensure there are no issues
Report any issues by following your company's issue reporting procedures. Be sure to tell them the time, date, and charger ID with which the error occurred
Charging Error
If charging still did not start and you receive a charging error:
- Check the Power LED on the charger to verify the power supplied to the charger is ON
- Check the charger handle to ensure it is plugged in properly to the charge port on the bus
- Verify charging has begun by checking the Charging LED on the battery charger
- Check that ‘Charger Connected’ and ‘Time to Full Charge’ is displayed in the message display center
If the bus is not going to be used for an extended period of time (+7 days), it is advisable to NOT leave it plugged into charger
For additional details on Blue Bird buses, please refer to the Blue Bird Drivers Handbook