![Highland_logo_1millionmiles_Brandmark_White-1.png]](https://24210048.hs-sites.com/hs-fs/hubfs/Highland_logo_1millionmiles_Brandmark_White-1.png?width=40&height=40&name=Highland_logo_1millionmiles_Brandmark_White-1.png)
Daily Tips
Personal protective equipment (PPE)
In addition to the PPE that is normally worn in a shop environment, PPE that protects the wearer against high voltage contact or arc flash must also be worn when appropriate.
Maintenance
Necessary safety precautions
If it is necessary to weld or plasma cut anything on the bus; the 12V battery will need to be disconnected first and then both High Voltage Manual Service Disconnects (MSD) must be disconnected. You should not disconnect MSD unless you plan to weld or plasma cut. During normal maintenance, MSD can be left in place.
Remove the key from the ignition before working on or under the bus, to prevent unintentional system engagement. Failure to comply may result in serious personal injury.
As standard practice, disconnect the 12V battery before performing any electrical work. Do not disconnect any orange cables or connectors on the vehicle. The orange cables indicate High Voltage. Training is needed to perform service on high voltage components safely.
Before any welding, cutting or drilling, be sure to inspect what is on the opposite side of the metal. Be cautious when welding to ensure hot metal does not melt wire insulation in the surrounding area especially on the opposite side of the work surface.
Surfaces with High Voltage under or close to the sheet metal are marked with a warning sticker. These surfaces in particular should not be welded, drilled or cut into because of the High Voltage components directly behind the sheet metal. These panels must be removed to be modified.
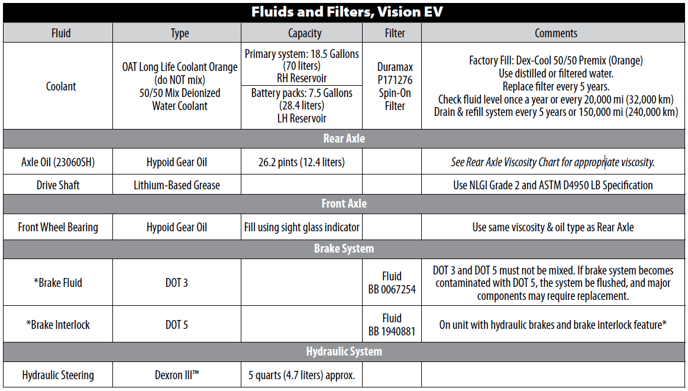
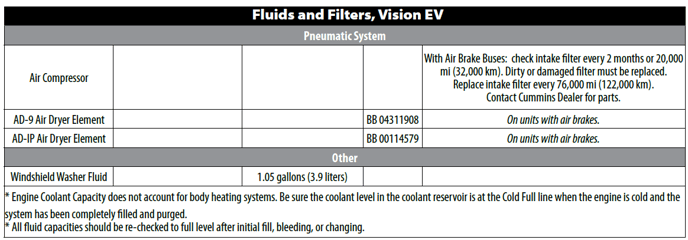
Fluids and filters
12V Battery Jump
If the 12V battery system has low voltage, the battery indicator will display on the instrument cluster, it may illuminate red. If the battery indicator is illuminated, the vehicle will not go into high voltage drive mode and the drive enable indicator will not illuminate, preventing the vehicle from starting.
If the low voltage battery system is less than 9 volts measured at the batteries, the system voltage is low and many of the control modules will not power up. In this situation, the 12V battery condition can be corrected by simply charging the 12V batteries or installing a 12V battery charge pack to the low voltage batteries.
In the event of charging a fully depleted vehicle, connect an approved 12V battery charger to the 12V battery system. The 12V battery system must have enough charge to wake-up the high voltage control system to enable charging. If the high voltage batteries have been depleted completely, they may not accept charge with being reset
To prevent personal injury and/or death, or damage to property, whenever disconnecting 12V battery terminals, always disconnect the ground terminal first. When reconnecting, always connect the ground terminal last. Failure to follow this procedure could also result in a short to ground.
To jump the 12V battery, do the following:
- Open the 12V battery access door and turn the disconnect switch to the OFF position
- Using a 6 amp minimum jump box or battery charger, carefully connect the cable clamps to the proper terminals (positive to positive and negative to negative). Do not allow clamps to touch each other or the other terminals
- Wait five minutes to allow the bus batteries to build an initial charge
- Leave the cables connected and turn the 12V disconnect switch to the ON position
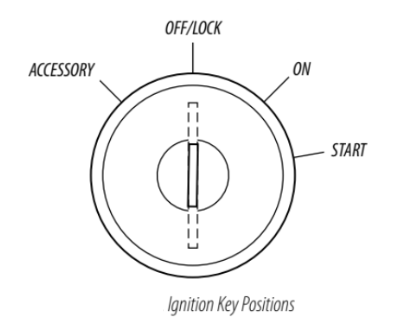
- Turn the ignition switch to the ON position
- Check to ensure that the parking brake is engaged

- Turn the ignition switch to the Start position and release. The power ON process may take up to 1 minute. The HV enable indicator will illuminate green. This indicates the bus is ready to be charged
- Allow the low voltage status to clear then disconnect the charging cables
- Close the access door
For additional details on Blue Bird buses, please refer to the Blue Bird Drivers Handbook