![Highland_logo_1millionmiles_Brandmark_White-1.png]](https://24210048.hs-sites.com/hs-fs/hubfs/Highland_logo_1millionmiles_Brandmark_White-1.png?width=40&height=40&name=Highland_logo_1millionmiles_Brandmark_White-1.png)
Driver Daily Checklist
Pre-Trip daily checklist
Before starting the electric vehicle, check the following conditions
- If the bus was left charging and is now ready for its trip, remove the charging handle from the vehicle charge port and return the handle to the charging station
- Coil inactive cords on to the holder on the charger
- Walk around the vehicle to make a visual inspection to ensure that tires are inflated, charge port and 12V battery doors are properly closed, there is no unexpected damage, and the vehicle is clear of people and obstructions
- Verify the driver and all passengers have properly secured seatbelts
- Adjust the seats and mirrors
- Verify that the parking brake is engaged
- Verify that the Drive Selector is in "Park" position
- Report any charger issues (including physical damage) to the shop. Be sure to tell them the time, date, bus number, and charger ID the issue occurred with
- Report any bus physical damage to the shop
Post-Trip daily checklist
- On the bus, turn the temperature and setting dials to the blue zone
- Make sure the vehicle comes to a complete stop
- Put the vehicle in the "Park" position by pressing the “P” on PRNDL controls. Wait until the "P" button is illuminated
- Engage the parking brake
- Confirm the bus key is in the "Off" position
Do not leave the key in the ignition when exiting the vehicle, and do not leave the ignition switched to "ACCESSORIES". These conditions can drain battery charge and reduce vehicle range
- If charging the bus, plug the handle into the charging port on the bus
- Ensure active charger cords are out of the walking path of staff and other vehicles
- Report any charger issues (including physical damage) to the shop. Be sure to tell them the time, date, bus number, and charger ID the issue occurred with
- Report any bus physical damage to the shop
Vehicle Operation
Starting the Blue Bird Electric Bus is different than starting an internal combustion engine powered bus. When you “start” the electric bus you are not starting an engine, instead you are preparing the bus for operation. Certain steps must be followed in a specific order before systems will become operational.
To start the bus, do the following:
- Disconnect the vehicle charging cable (if connected)
- Wait 10 seconds and verify that the shifter is no longer illuminated before proceeding to the next step
- Ensure the Parking Brake is engaged
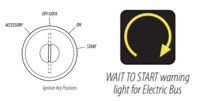
- Turn the ignition key to “ON” position. The WAIT TO START light should illuminate
- Ensure the vehicle is in park mode (the bus is in Neutral and the parking brake is on)
- Once the “WAIT TO START” light is no longer illuminated, the bus is ready to start
- Turn the key to the “START” position. Release the key as soon as the vehicle is enabled (≈1 second)

- When the vehicle is enabled, a click may be heard from the battery contactors closing and Bus Enabled in the instrument panel's right warning bank illuminates
- Put your foot on the brake pedal and release the parking brake
- For forward motion push “D” while holding the brake pedal. You should see the “Bus Enabled” icon
When the “Bus Enabled” indicator is illuminated and upon selecting forward or and the shifter panel is “Blinking”, check the following interlock safety features:
- Entrance Door must be completely closed
- Driver’s Seat Belt must be fastened properly
- Any optional brake interlock feature conditions satisfied (Example: Wheel Chair Lift Doors)
To shut down the bus, do the following:
- Press the service brake pedal until the vehicle has come to a complete stop
- Engage the parking brake while continuing to press the service brake pedal
- Push the Neutral "N" button on the selector panel
- Release the service brake pedal
- Turn the ignition key to the "Off" position
- Remove the key from the ignition. Once the key has been removed, it may take up to 10 seconds for the system to shut down completely
Do NOT leave the key in the ignition, even in the OFF position. It may drain the 12V battery
Anti-Roll Back and Creep
The bus is equipped with an anti-roll back feature. The system is designed to prevent movement in the opposite direction of the selected shifter position. If in Reverse, it reduces forward motion or in Drive, it reduces backward motion. The effort to hold the vehicle still comes from the electric traction motor. Because electric motors can overheat, the anti-roll back feature will timeout and release the vehicle to roll freely after 5 seconds. The feature is reset every time the vehicle comes to a complete stop and the brake pedal is pressed.
The anti-roll back feature will time out and release the vehicle to roll freely 5 seconds after the brake pedal is released. Re-apply the brake pedal or accelerator pedal before that time has elapsed or the vehicle will roll due to gravity.
Roll back distance
On grades up to a 10% slope, the vehicle roll back distance is <1 ft (30.5 cm) while the feature is active. The maximum grade the vehicle can launch is a 20% slope. At that grade, the maximum roll back distance is 2 ft (61 cm) while the feature is active.
For additional details on Blue Bird buses, please refer to the Blue Bird Drivers Handbook